
Turning your ignition key or pressing the start button only to hear a faint click or complete silence is a frustrating experience every driver fears. Whether you are packed for a beach day at Mona Vale, heading off on your morning commute along Pittwater Road, or getting ready to leave work in Warriewood, a flat battery instantly halts your plans. Moist coastal air, fine salt spray, and frequent short trips across the Northern Beaches can take a heavy toll on 12-volt automotive batteries, accelerating corrosion and reducing charge retention.
At Peninsula Auto Clinic, our local Mona Vale workshop has been keeping community vehicles reliable and road-ready since 1994. Having served Northern Beaches drivers for over 30 years, we know how inconvenient a dead battery can be. Here is a clear, safe, step-by-step guide on how to jump-start your vehicle using jumper cables, along with essential safety precautions to protect your car’s sensitive electrical systems.
Essential Safety Precautions Before You Begin
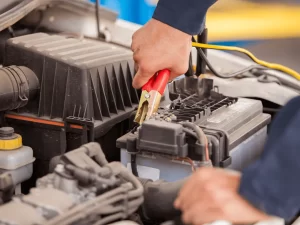
Modern vehicles are equipped with complex electronic control units (ECUs), delicate sensors, and digital infotainment displays. An improper jump-starting sequence or an accidental polarity reversal can cause severe electrical short circuits. Before connecting any cables, keep these rules in mind:
- Ensure both vehicles are parked close enough for the jumper cables to reach comfortably, but verify that the metal bodies of the cars are not touching.
- Turn off the ignition, headlights, air conditioning, and sound systems in both vehicles to prevent power surges.
- Engage the park brake firmly on both cars (or select Neutral/First gear for manual transmissions).
- Inspect the flat battery for signs of severe swelling, cracks, or leaking fluid. If the casing is damaged, do not attempt to jump-start the vehicle.
Step-by-Step Guide to Jump-Starting Your Vehicle
Step 1: Locate the Battery Terminals and Position the Cables
Pop the bonnets of both vehicles and locate the batteries. Identify the positive (+) terminal, which is usually marked in red or covered with a red plastic cap, and the negative (-) terminal, which is typically marked in black. Untangle your jumper cables and lay them out on the ground, making sure the red and black clamps never touch each other while connected to a live battery.
Step 2: Connect the Red Cable to the Flat Battery
Attach one end of the red (positive) jumper cable clamp securely to the positive (+) terminal of the discharged battery. Ensure the metal teeth grip the lead post firmly to establish strong electrical conductivity.
Step 3: Connect the Red Cable to the Donor Battery
Take the opposite end of the red (positive) jumper cable and clamp it securely onto the positive (+) terminal of the fully charged donor battery.
Step 4: Connect the Black Cable to the Donor Battery
Attach one end of the black (negative) jumper cable to the negative (-) terminal of the functioning donor battery.
Step 5: Attach the Remaining Black Cable to an Unpainted Metal Ground
Do not attach the final black clamp to the negative terminal of the dead battery. Connecting to a dead battery’s negative post can spark near escaping hydrogen gas. Instead, clamp the remaining black (negative) cable to an unpainted, solid metal part of the engine block or chassis frame on the breakdown vehicle, away from the battery and fuel lines.
Step 6: Start the Donor Vehicle Engine
Start the engine of the donor car and let it idle for three to five minutes. This allows the working alternator to pass a steady charge into the depleted battery. Slightly raising the donor vehicle’s engine revs can speed up the transfer.
Step 7: Start the Vehicle with the Flat Battery
Attempt to start the engine of the vehicle with the flat battery. If the engine cranks and fires up, let both vehicles idle together for a minute. If it struggles to turn over, wait another three to five minutes to allow additional charge to build up before trying again.
Disconnecting the Cables Correctly
Once your vehicle is running smoothly, disconnect the jumper cables in the exact reverse order in which they were attached, ensuring the metal clamps do not touch each other or any metal vehicle surfaces:
- Disconnect the black (negative) clamp from the ground metal surface of the breakdown car.
- Disconnect the black (negative) clamp from the donor battery.
- Disconnect the red (positive) clamp from the donor battery.
- Disconnect the red (positive) clamp from the newly started battery.
Leave your engine running continuously for at least 20 to 30 minutes, ideally driving along open stretches like Barrenjoey Road through Newport or Bilgola, to allow your alternator to replenish charge.
What to Do if Your Car Battery Fails Again
A jump-start is a temporary emergency fix designed to get you out of a difficult spot. If your battery continues to lose charge, dies overnight, or struggles during cold starts, it has likely reached the end of its functional life. Vehicle batteries in coastal environments typically last between three and five years before internal grid breakdown occurs.
Combining a battery voltage check with your regular logbook car servicing ensures your alternator, starter motor, and charging circuits remain in peak condition. If testing shows your unit can no longer hold charge, organising a prompt car battery replacement will prevent unexpected breakdowns in the future.
Trust Peninsula Auto Clinic for Professional Battery Care
Whether you are dealing with persistent starting troubles, flickering dashboard lights, or general mechanical concerns, our neighbourhood auto clinic provides comprehensive battery testing, electrical diagnostics, and general mechanical car repairs. We use state-of-the-art diagnostic tools to test battery health and charging output, ensuring your car starts reliably every single time.
Don’t let a failing battery leave you stranded on the Northern Beaches. Speak with the experienced local team at Peninsula Auto Clinic today. Call our Mona Vale workshop on 02 9999 2553or arrange a service online via our contact page.